I originally thought there wasn’t much to write about building a new PC, but after thinking it over, I realized there are actually quite a few pitfalls. From picking the hardware, to installing the OS, then spending ages getting headless game streaming working, and finally ricing the desktop. So I figured I’d just write down the whole process, as a reference for my future self and for everyone else.
Picking the Hardware
Let’s start with the parts list:
- CPU: Intel Core i5-13490F
- Motherboard: Colorful B760M-T WIFI DDR4
- RAM: Corsair Vengeance Pro DDR4 3200MHz 16GB + ADATA Wanziqianhong DDR4 2400MHz 8GB
- GPU: ASRock RX 9070 GRE Steel Legend
- Storage: WD SN570 1TB NVMe SSD
- PSU: Thermalright SP750 750W 80PLUS Platinum, fully modular
- Case: just some random one
- Cooler: just some random one
For all of the hardware above, my total cost was around ¥4900. Note: this price already subtracts the income from “selling two RAM sticks I had at home.” Without that, the cost would be around ¥5450.
Answering a Few Questions
To preempt the nitpickers, let me answer some questions that might come up.
Why build a new PC?
At the time I’m writing this, RAM prices are insane. A single stick of 16GB DDR5 6400MHz costs ¥1300, and even a 16GB DDR4 3200MHz stick goes for ¥600 on JD.com. So why build a new PC now? As everyone knows, I currently use a MacBook Air M3, and I usually develop by connecting over SSH. My old dev machine was an i5-4440S — already 13 years old. It’s not unusable, but the experience really isn’t great. Actually, I mostly just wanted a PC I could game on; everything above is just an excuse.
Why not just buy a prebuilt?
Only a fool buys a prebuilt.
Why mix-and-match RAM sticks?
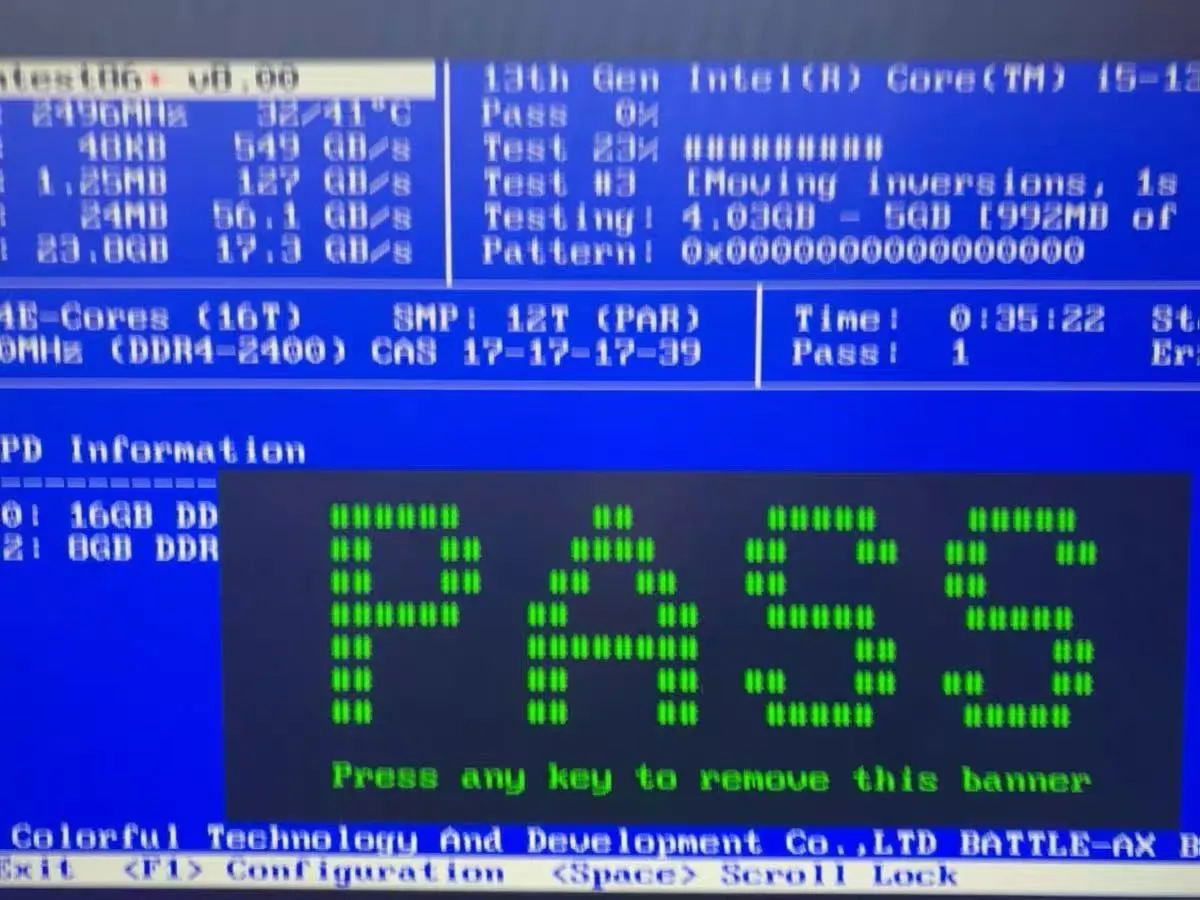
Because it’s cheap! That 8GB stick was pulled from my old PC at home, and it was useless otherwise. “But doesn’t mixing sticks limit the frequency?” Good question! But somehow that ADATA stick of mine has a really good silicon lottery. I just turned on XMP in the BIOS like an idiot, and the memory frequency jumped straight to 3200MHz, with timings of 18-20-20-40, no problem at all. (The timings are a bit loose, but still better than running at 2400MHz.) After it passed the MemTest86 test, I started using it without worry.
Where did the SSD come from?
That NVMe SSD was a storage-upgrade drive I’d previously bought for my MacBook Air M3 (bought over summer break, ¥330). Hahaha, the same drive now costs ¥899.
13th-gen Core CPUs degrade, and you still bought one?
Good question! But guess what? The i5-13490F, as a version Intel made exclusively for the Chinese market, used the same architecture design as 12th-gen Alder Lake back then to save costs — no degradation 🙂↔️. Its core configuration is almost identical to the i5-12600KF. (Back then the i5-13400F mixed Alder Lake and Raptor Lake cores, and people actually wanted to win the Raptor Lake lottery — only for those to be the ones that degrade. Who’d have thought there’d be a plot twist here too!)
Why not AMD?
If you want to go with DDR4 RAM on AMD, only the Zen 3 architecture supports it. Zen 3 feels a bit too old. Also, AMD platform performance is very tightly coupled to memory frequency (its Infinity Fabric frequency is linked to the memory frequency), and there’s no way I could afford DDR5 RAM.
I think after answering the questions above, everyone should have a decent understanding of my thinking when picking hardware. Let me mention a few more points I paid attention to while choosing parts:
- It’s best to pick a PSU that supports the ATX 3.1 standard. After all, GPU power draw keeps climbing, and ATX 3.1 specifies the power-delivery requirements for the 12VHPWR connector as well as peak-power requirements, which better protects your hardware.
- It’s best to get a motherboard with built-in WiFi and Bluetooth modules, because this GPU is a fairly high-end model and physically large (it occupies 2.9 slots), which effectively blocks the bottommost PCIe x1 slot on the motherboard. If the motherboard doesn’t come with WiFi and Bluetooth, you won’t be able to add a wireless card. (You’d only be able to use a USB wireless adapter, which I personally don’t really like.)
- It’s best if the GPU’s warranty supports individual RMA. Among GPU vendors today, not many support individual RMA — ASUS, GIGABYTE, MSI, Colorful and others do, but ASRock doesn’t, so you’d have to go through a reseller for repairs. (That’s why I chose to buy from JD’s self-operated store, so JD handles the RMA for me and there’s no runaround.)
Building the PC
Building a PC actually isn’t hard — there are plenty of build videos and tutorials online — but I got stuck for a moment on the CPU installation, because it was a bit different from the PCs I’d built before.
This time I used a 13th-gen Intel CPU, which uses the LGA 1700 socket. I’d only ever installed LGA 115x (6th-gen Core) and LGA 3647 (1st-gen Xeon Scalable) CPUs before. The main differences here are: (1) when installing the CPU, you don’t just drop it in and flip the retention lever down — while pressing the lever down, you also need to hold down the top-left corner of the retention bracket, otherwise the bracket won’t latch. My guess is that this is because the CPU is no longer square but rectangular; (2) when installing the cooler’s mounting bracket, the four corners of the cooler’s backplate need to be “pulled” outward a bit to widen the spacing between the standoffs, so they can fit into the holes on the motherboard.
Let’s just admire the finished result 🤗
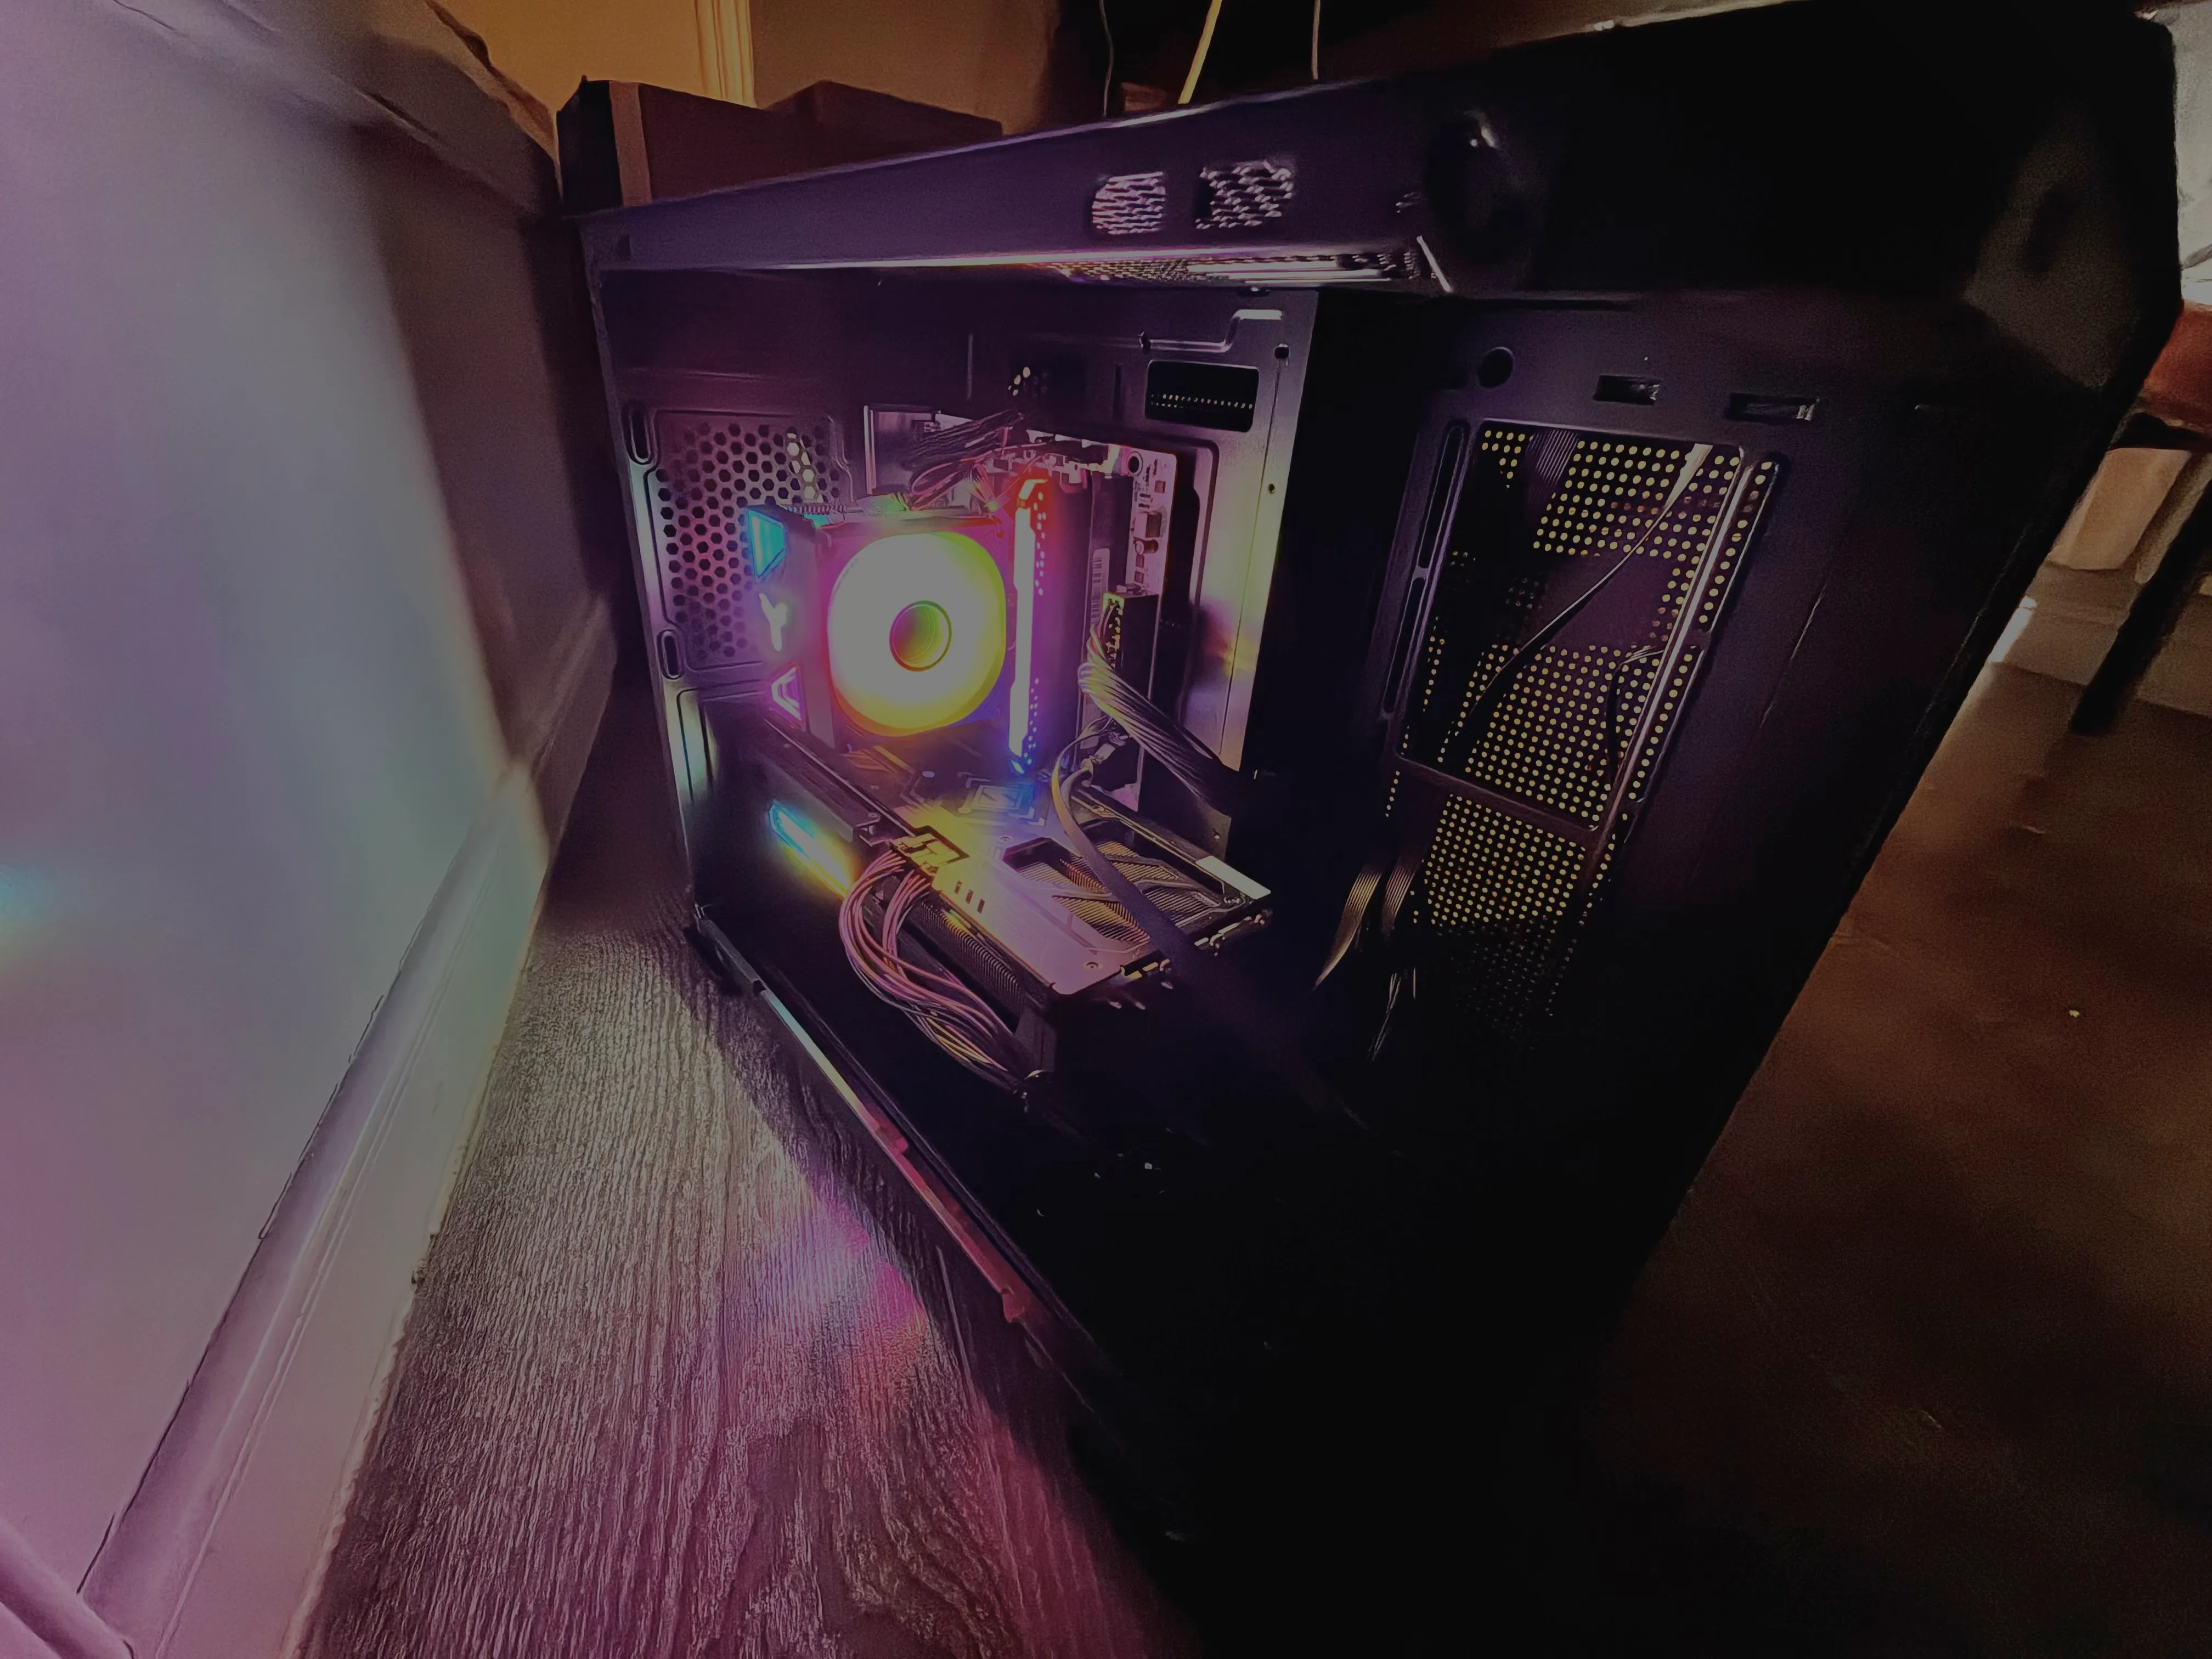
btw I really don’t like RGB, but the industry consensus is that a GPU without RGB is roughly the most stripped-down model in its tier, and I didn’t want to buy a stripped-down GPU. I’ll look into how to turn off the RGB lights on the CPU cooler and GPU later. Otherwise my PC turns into a walking disco.
Of course, the glass side panel isn’t on yet (because I’m also planning to install three fans), so it looks a bit messy. I’ll post another photo once I’ve installed the fans. And I’ll definitely tidy up the cable management again — but not now, because I built this PC at home, and when I move it to school I’ll definitely have to remove the GPU and CPU cooler, so I’ll hold off on cable management for now.
Installing the OS
This time I installed Arch Linux. I tried something different: PXE Boot + the Arch Linux Netboot image to install the system. No USB drive used the entire time. Super satisfying. Let me also share my process for setting up a PXE Boot environment.
Setting Up a PXE Boot Environment
PXE Boot is basically booting a computer over the network. I don’t really want to go into how it works here (if you’re curious, it’s based on DHCP and TFTP; I covered what DHCP is in my previous blog post, feel free to check it out). The procedure is: first you need to enable an option in the motherboard called “Network Stack” (which sounds like it has nothing to do with network booting), then reboot into the BIOS, and you’ll most likely see an option called “PXE Boot” in the boot tab.
Having this option still isn’t enough — we also need to feed a specific Bootloader file to the computer. In short, we need to set up a server that “feeds the Bootloader to the computer.”
I referenced this article ↗, but with a slight modification. The article mentions:
Go Version 1.18 changed the way that go get works. As of that version it now manages module dependencies and no longer fetches, compiles and installs tools/binaries built in Go. You want go install for that as of 1.18, however, pixiecore won’t build in 1.18, so you need to run go install using go 1.17, no newer. This is because they project is basically abandonware now for whatever reason.
Actually, there’s no need to go through all that trouble installing a Go 1.17 environment. Considering that everyone’s Go environment is a newer version (mine is 1.24, for example), we can just clone the source ourselves and compile it with the new Go version. The specific steps are as follows:
git clone https://github.com/danderson/netboot.git
cd netbootThen compile:
go build -o pixiecore-bin ./cmd/pixiecoreOnce it’s compiled, we can use netboot.xyz, a really handy PXE Boot. First we download the UEFI Bootloader:
wget https://boot.netboot.xyz/ipxe/netboot.xyz.efiThen run pixiecore:
sudo ./pixiecore-bin boot "netboot.xyz.efi" --bootmsg "booting from pxe" -d --ipxe-efi64 "netboot.xyz.efi"And with that, our PXE Boot server is set up. Next, we just need to select PXE Boot on the target computer (note that it must be on the same LAN, and the computer to be booted needs to be plugged into an Ethernet cable). Then, in the terminal where pixiecore is running, you’ll see something like this:
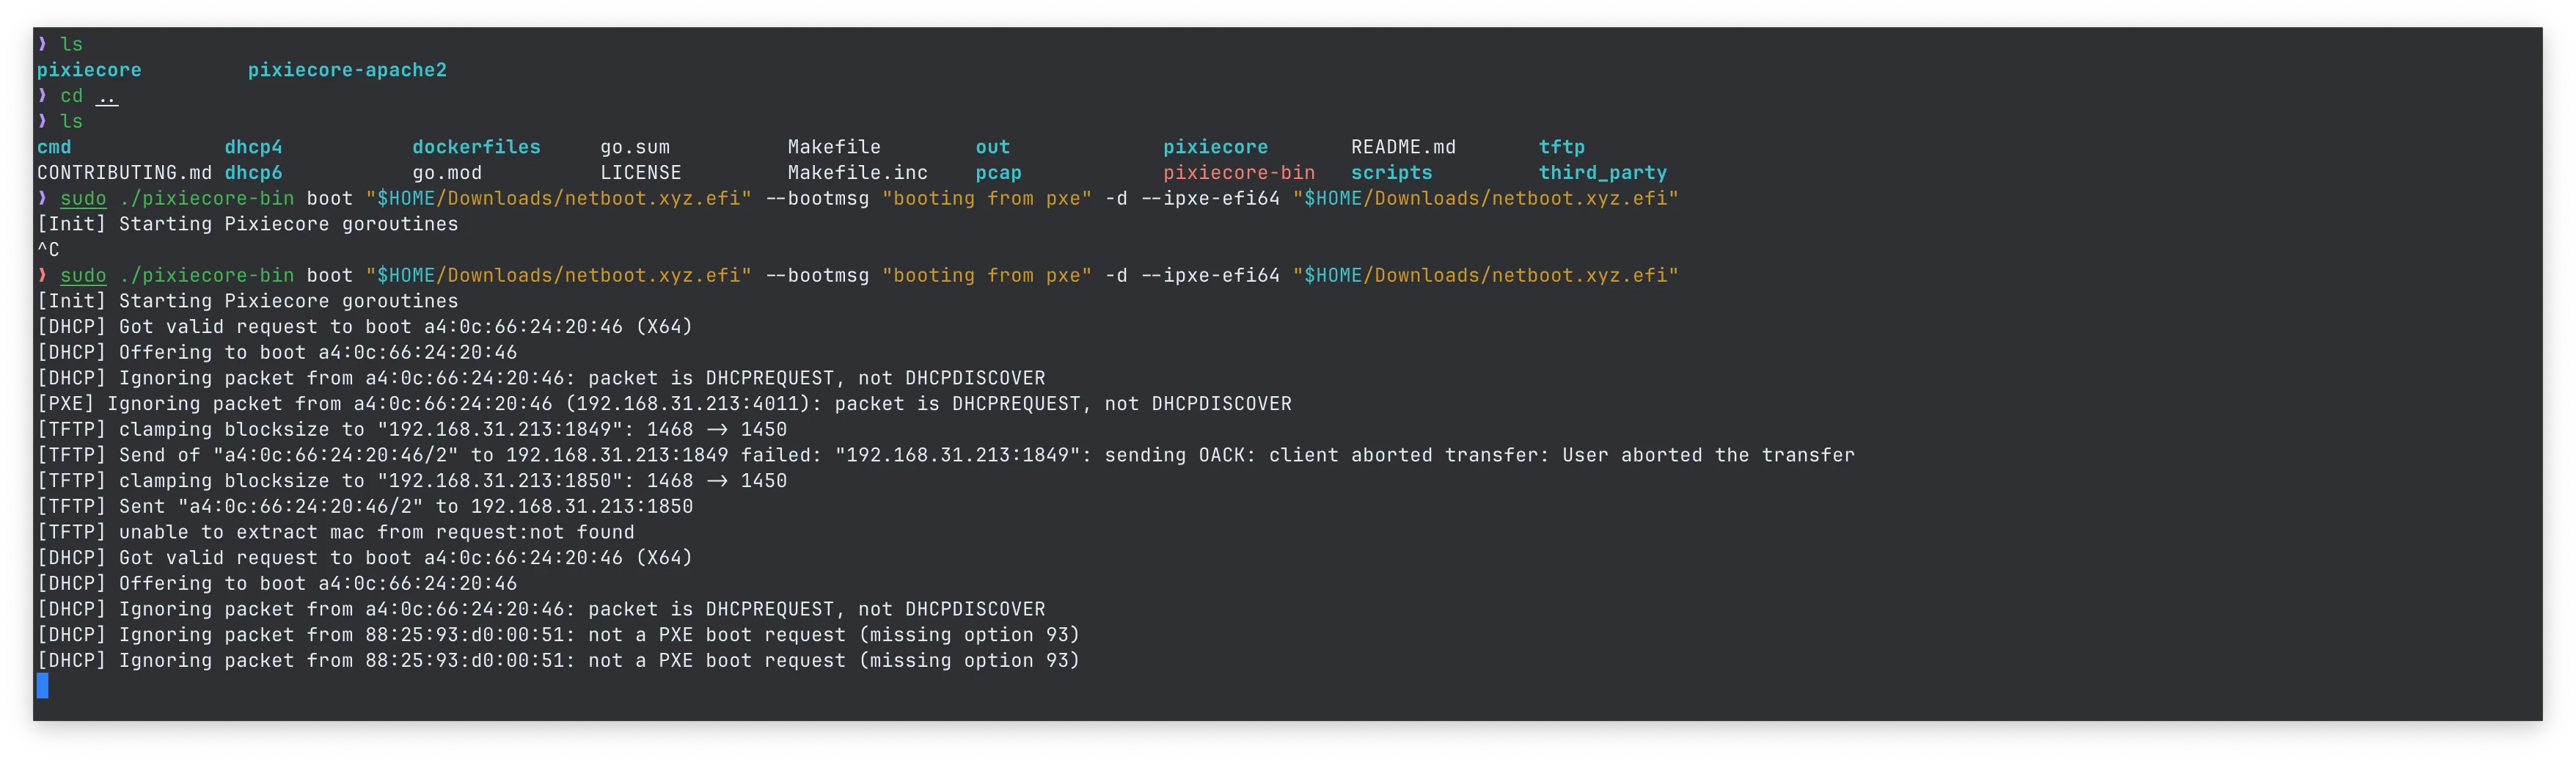
And on the target computer you’ll see a screen like this:
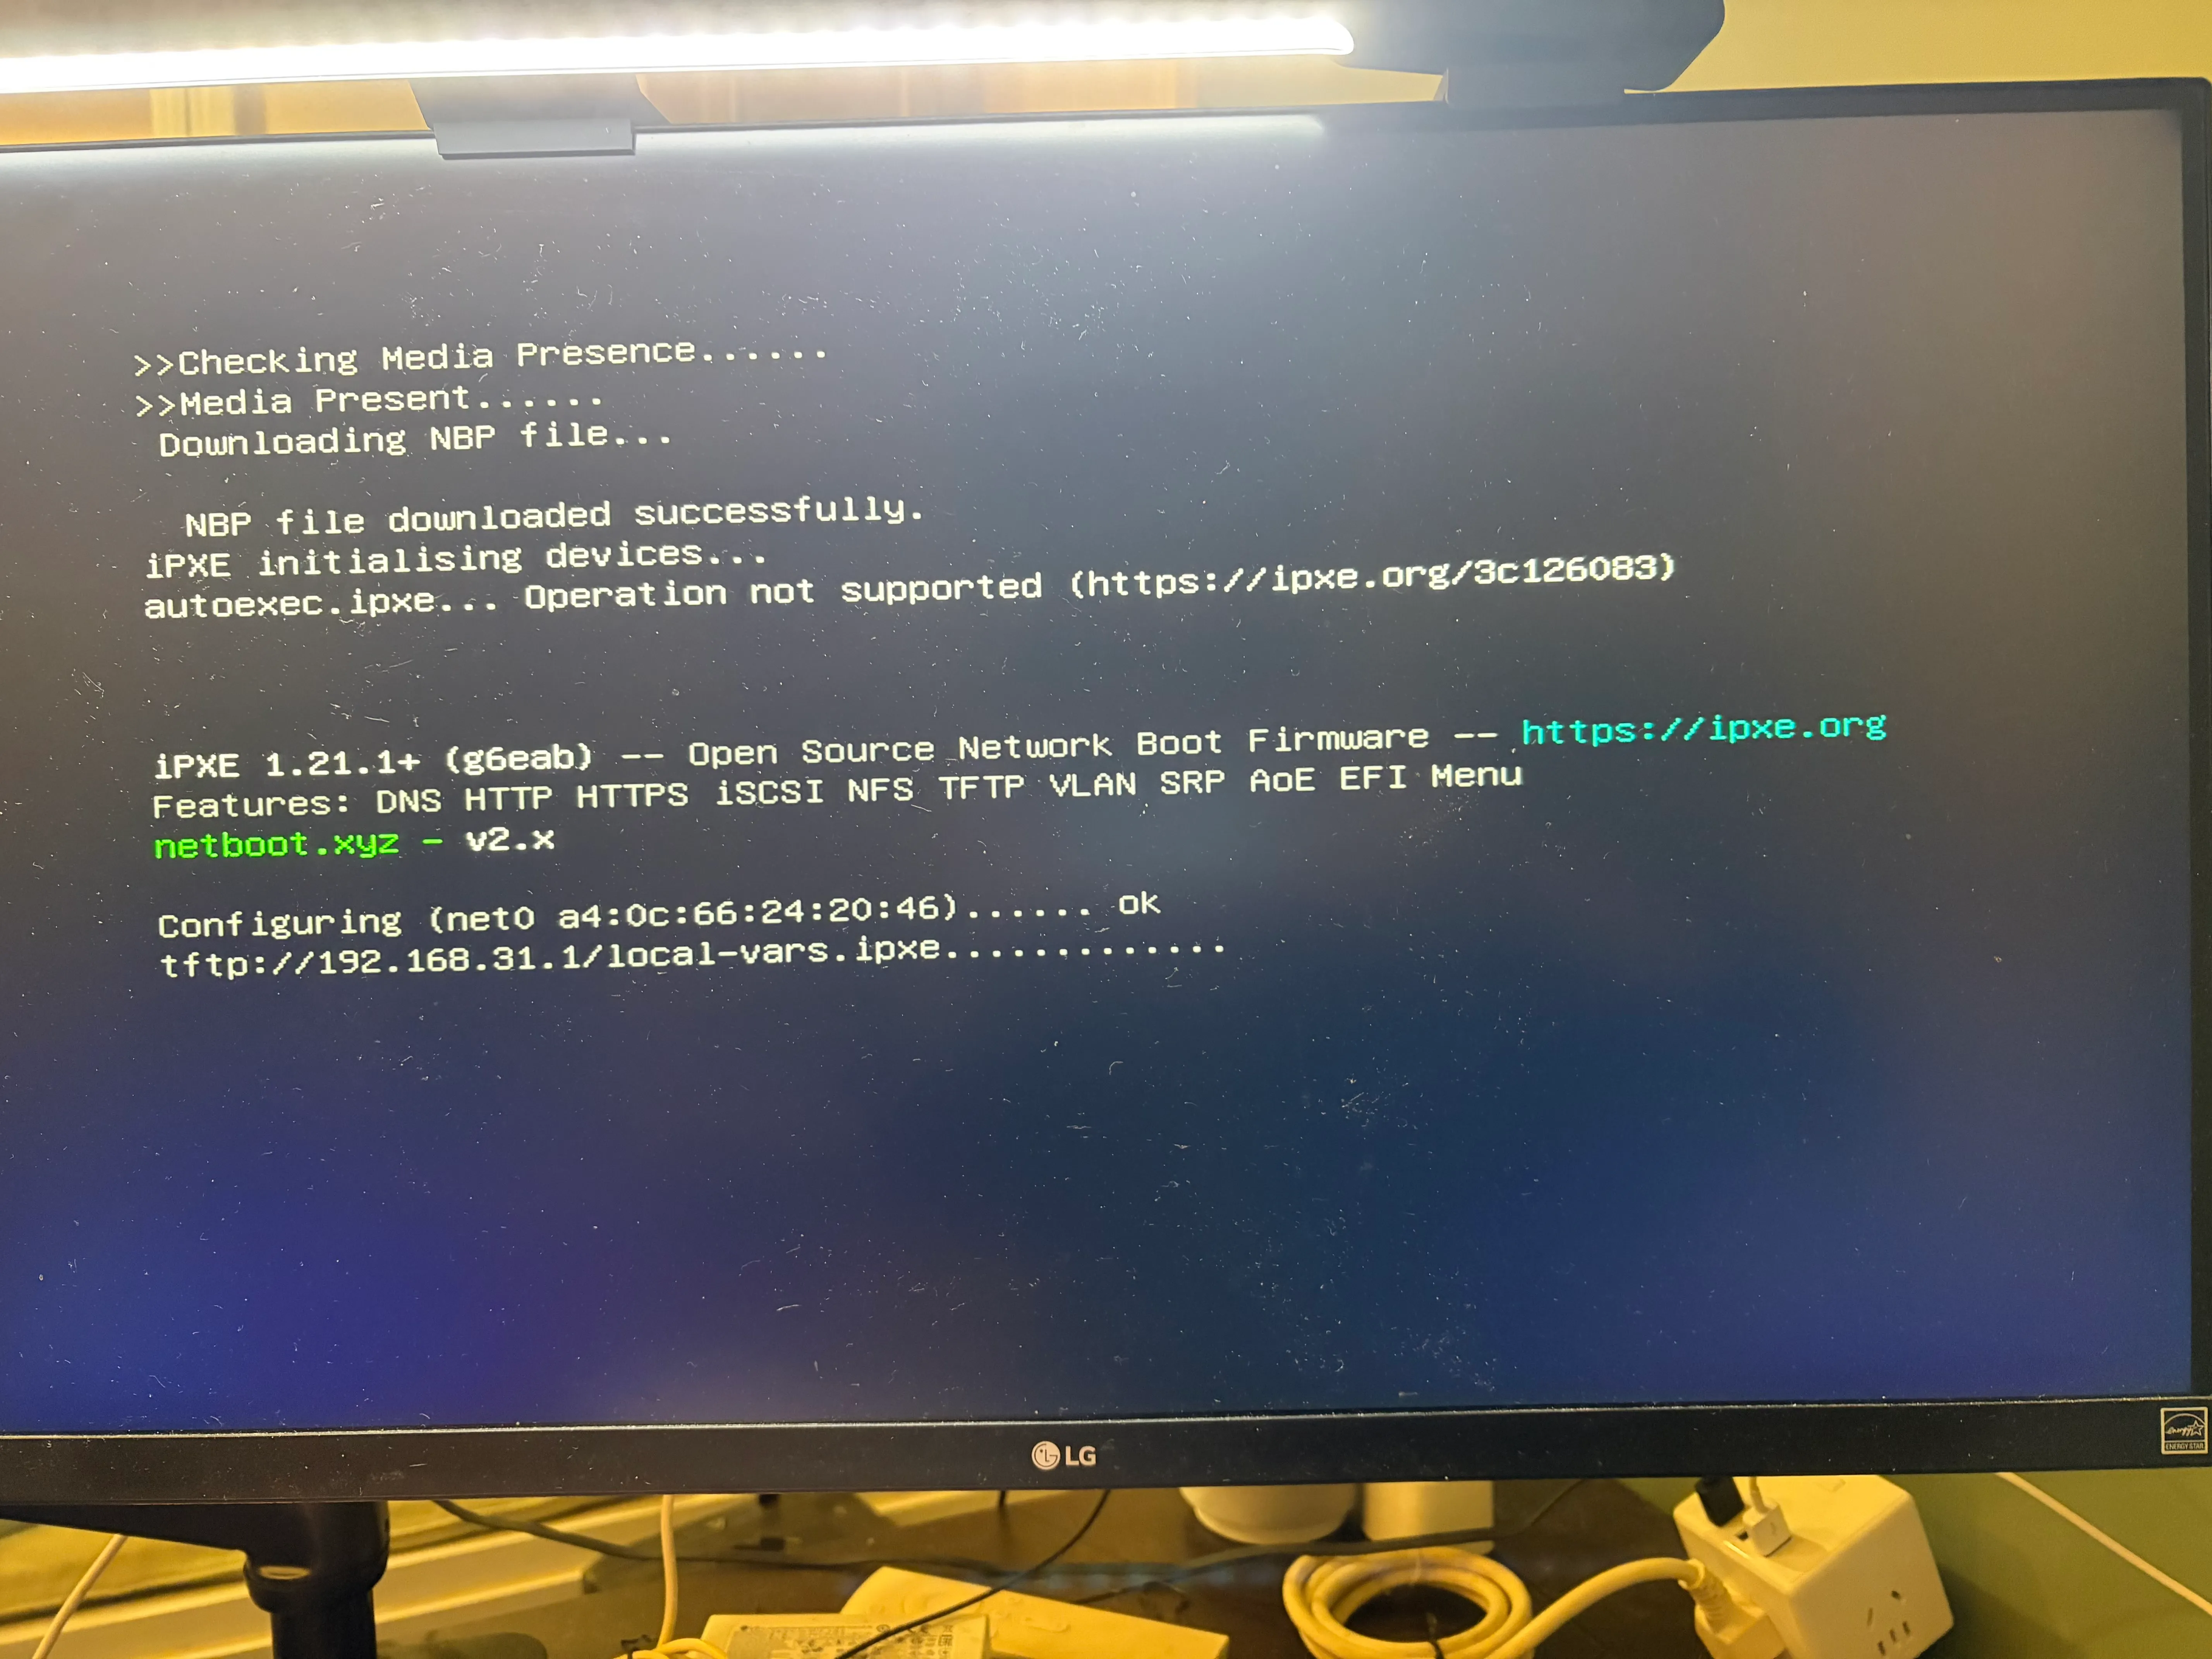
After the progress bar finishes, you’ll enter the netboot.xyz main menu:
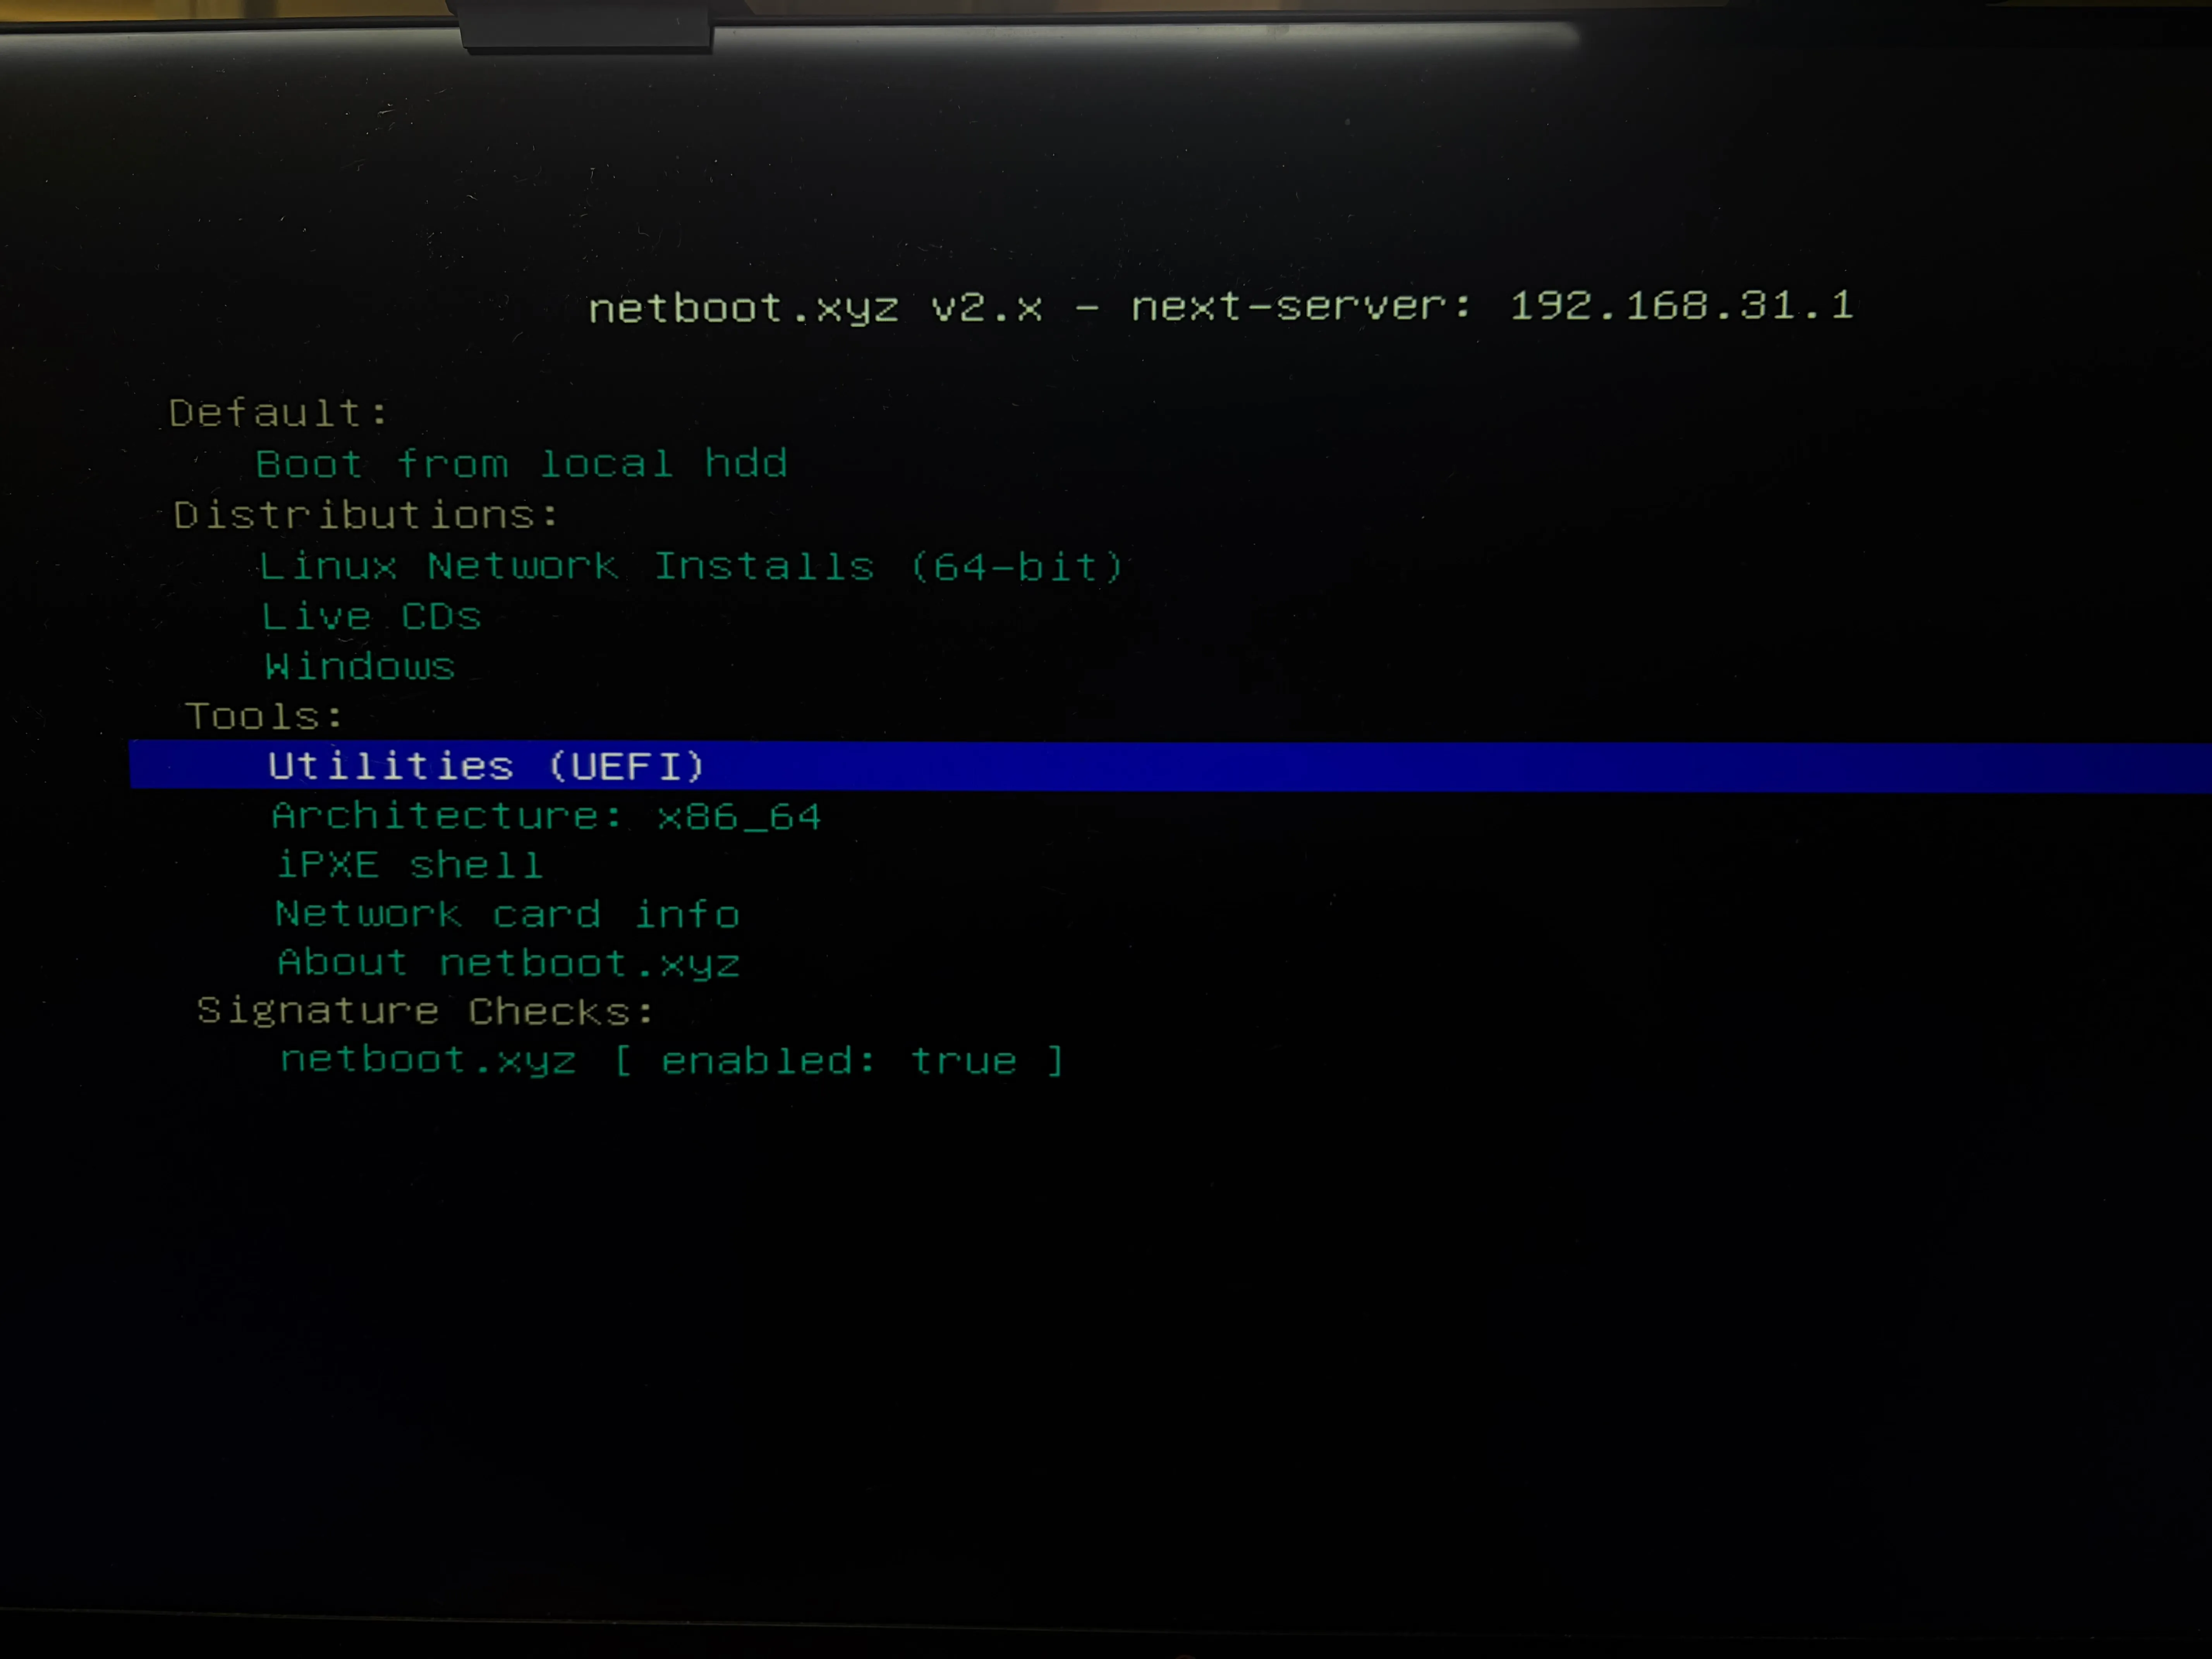
Here we select “Linux Network Installs” -> “Arch Linux”, and it will download the Arch Linux Netboot image and boot it. After that you can install Arch Linux following the steps on the Arch Wiki. Likewise, we can also choose to install other Linux distributions, such as Ubuntu, Fedora, and so on. I haven’t tried installing Windows with it (even though it also provides a Windows install option); if any of you have tried, let me know in the comments how it went.
If you run into problems downloading the Arch Linux Netboot image (e.g. slow download speeds or download failures), it’s because you haven’t switched mirrors. I couldn’t find a way to make netboot.xyz swap the archlinux netboot image to a domestic (Chinese) mirror. If your network is fine, just download it directly — it’s not that big anyway (about 700MB). If your network isn’t great, I likewise recommend using Arch’s official PXE to boot. There, the homepage will first ask you to choose a region; after selecting China you can pick domestic mirrors like Aliyun, Tsinghua University, or Nanjing University, and the download speed will be much faster. For details, refer to the PXE Boot section on the Arch Wiki ↗. The logic is exactly the same — you just replace netboot.xyz.efi in the command with the .efi file downloaded from Arch’s official source.
Under the Utilities tab in here, there’s also an option called “memtest86+ (v8.0.0)” that you can use to test whether your RAM has problems — very convenient. That’s exactly what I used to test and pass my mix-and-matched RAM stick.
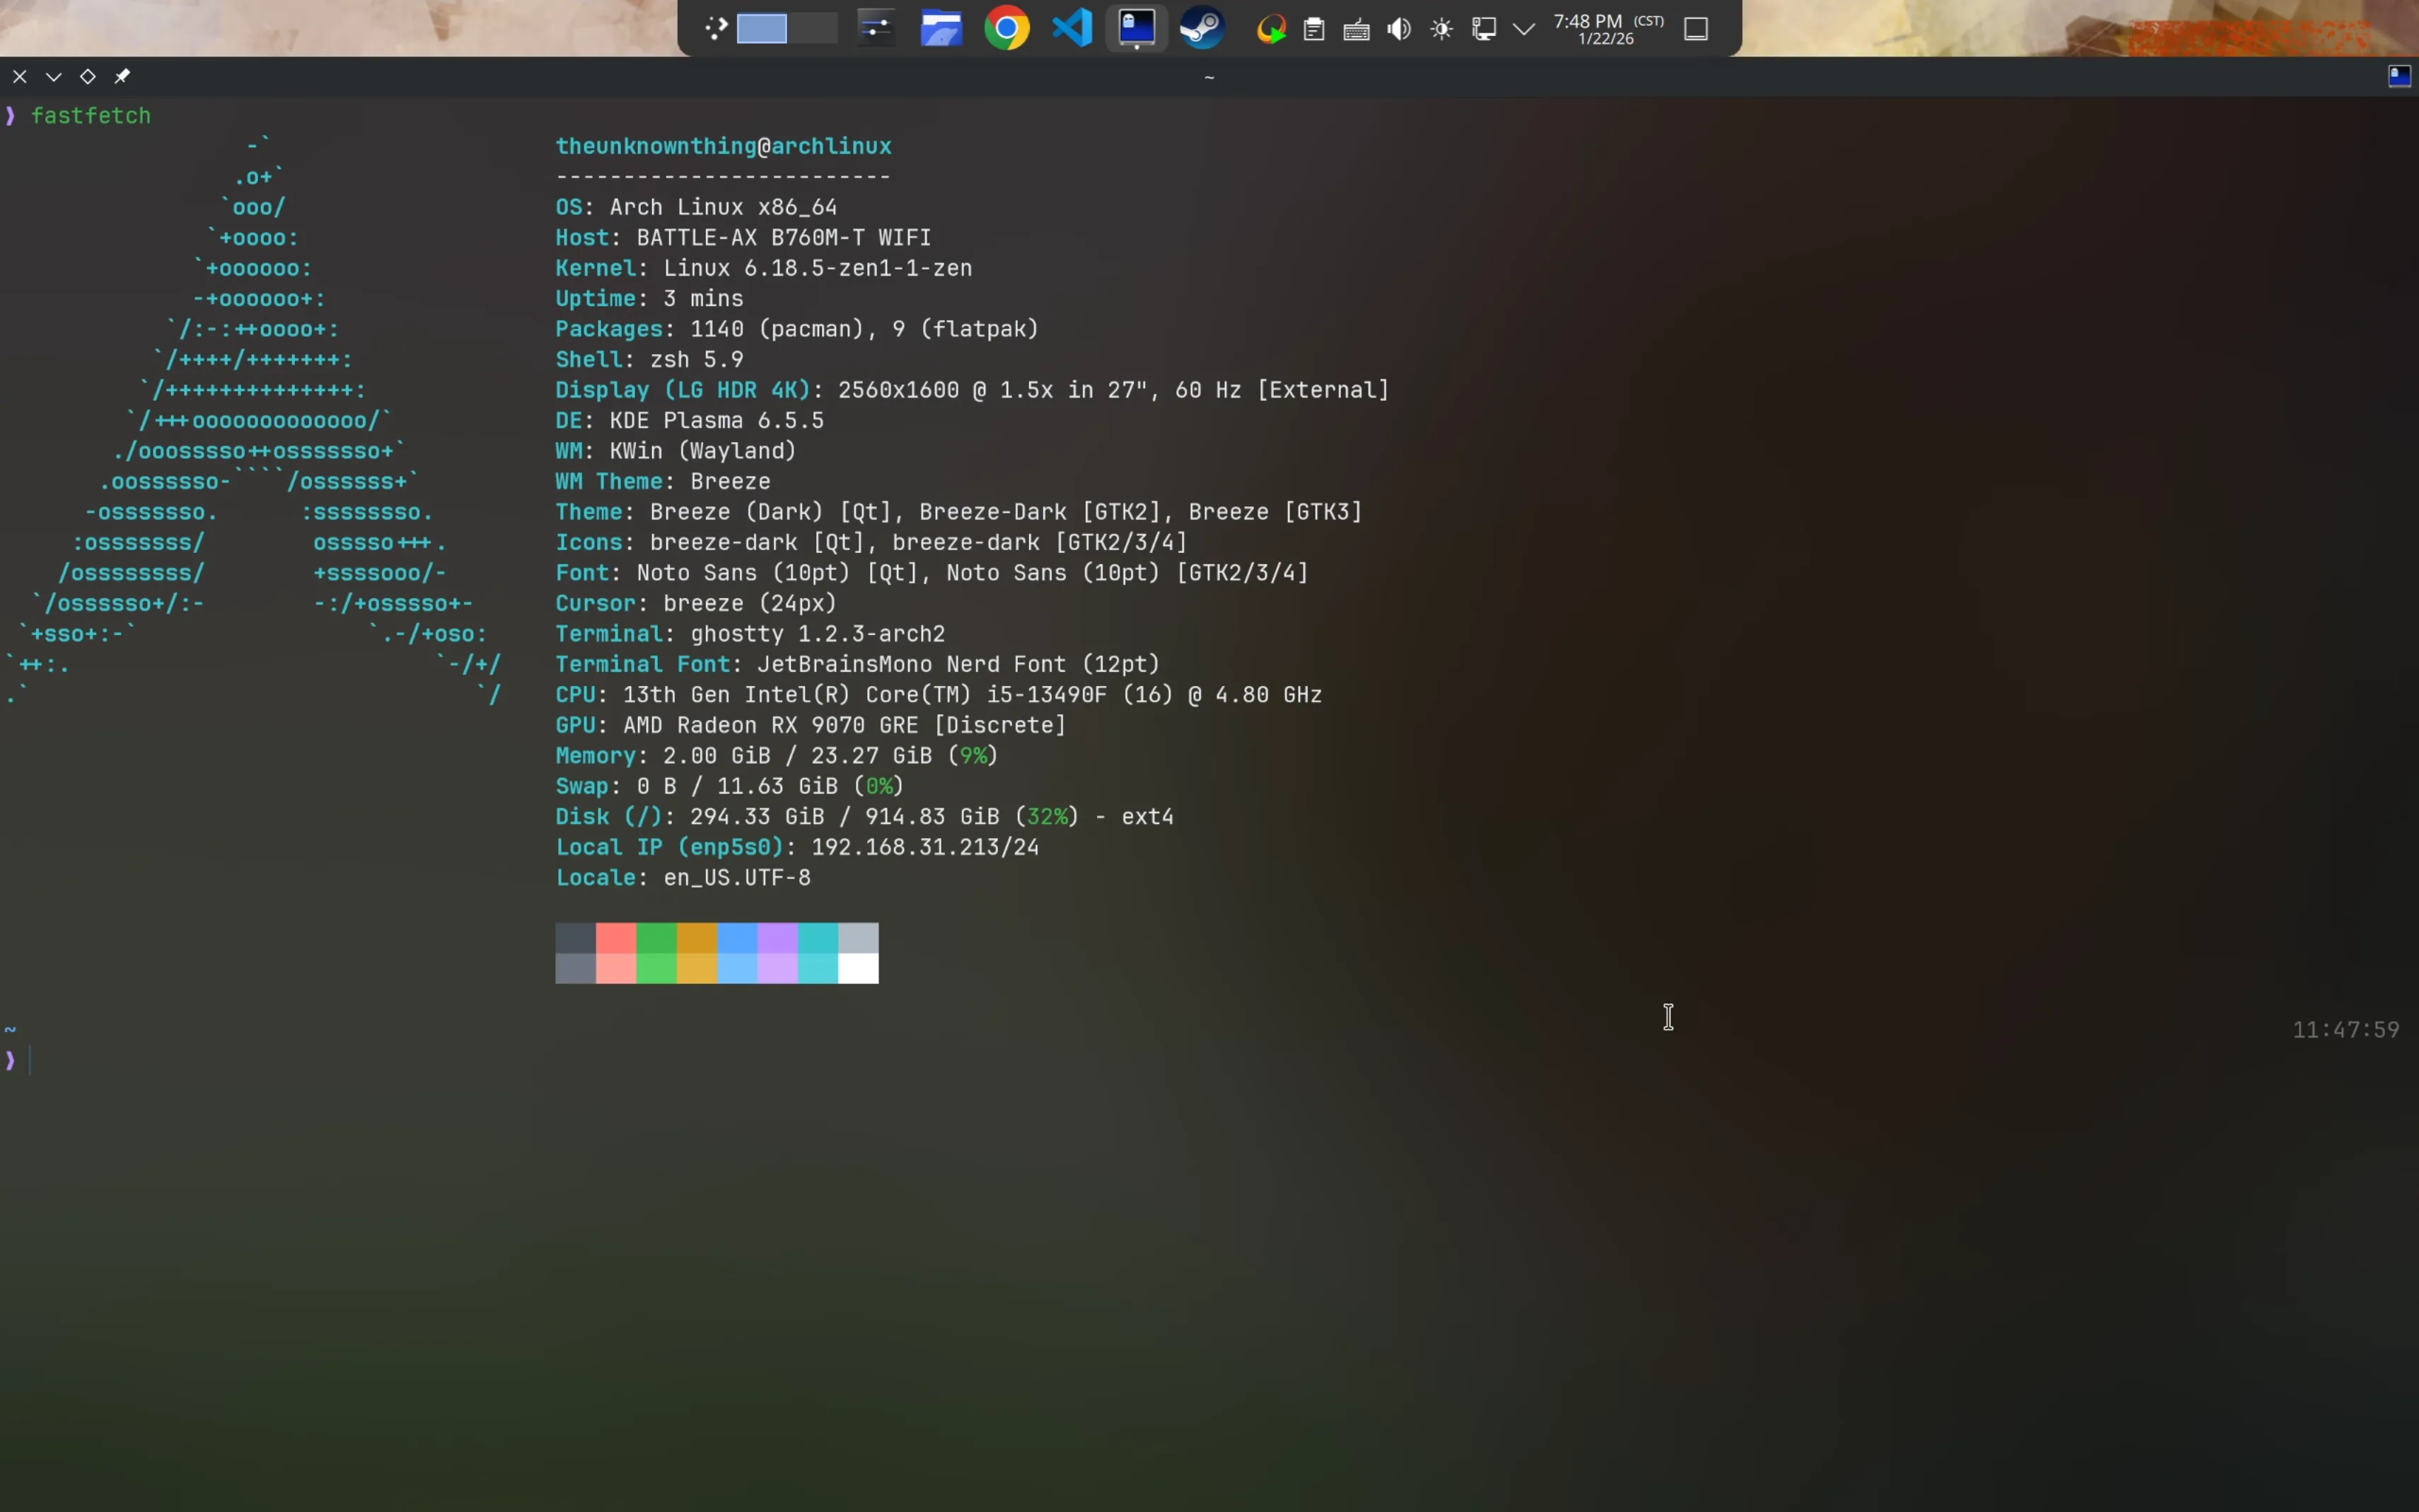
Here’s a screenshot after I finished installing Arch Linux (the desktop ricing comes later; this is not the final look):
Gaming
Buying such a nice GPU obviously means I’m going to game, and I specifically chose an AMD GPU for Linux (So NVIDIA, Fuck You). AMD GPUs have excellent community driver support. During archinstall, it’ll even prompt you to choose between AMD’s proprietary driver and the community driver. The community driver often performs better; the proprietary driver is for big enterprise clients and is (perhaps) more stable.
Undervolting and Unlocking the Power Limit
Here we want to both undervolt and unlock the power limit. As for why I don’t say “overclocking,” hear me out:
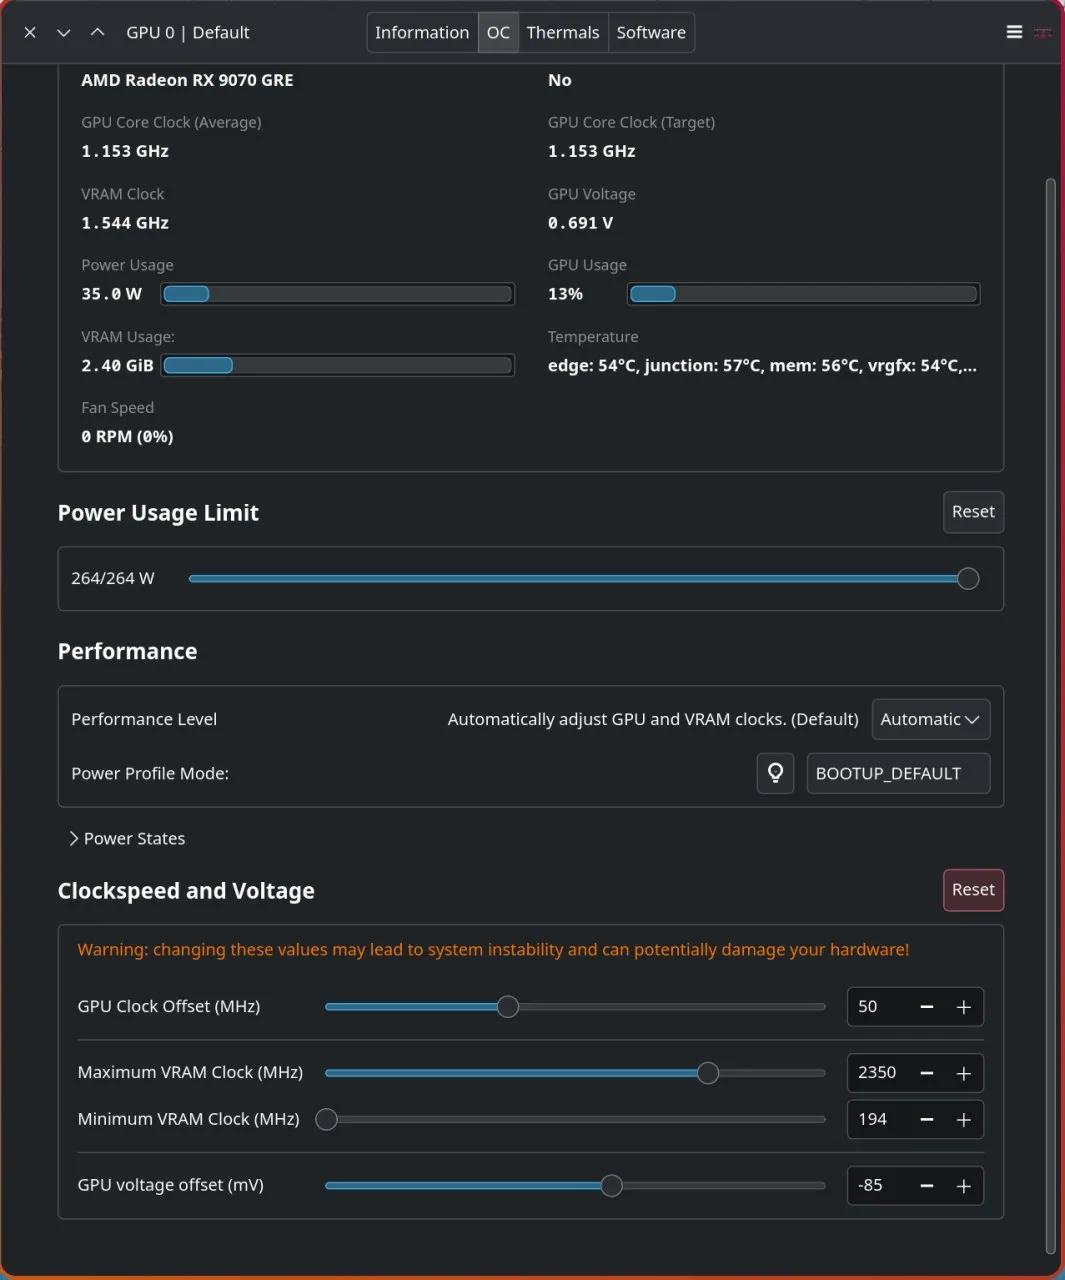
Modern AMD GPUs often have their base clocks rated very conservatively (take my 9070 GRE for example — its base frequency tops out at only 2350MHz), and at that frequency you can’t even saturate the power budget at all (again, in my case, it only draws around 160~200W, while the TDP is 240W). At this point, if the GPU’s Performance Level is set to “Automatic” (see the image below), the GPU will try to boost to as high a frequency as possible to eat up the full power budget. Under heavy game loads (like Cyberpunk 2077), the GPU can’t reach the maximum frequency rated by the board vendor. Therefore, what truly limits a GPU’s frequency is often not “how much you’ve overclocked it” but “whether the GPU can even reach that frequency” — that is, “whether there’s enough power headroom to let it run at that frequency.”
With that in mind, all we need to do is undervolt + unlock the power limit. Undervolting lets the GPU draw less power at the same frequency, so the GPU can run at a higher frequency. Unlocking the power limit is likewise to let it reach higher frequencies.
As for the specific configuration, every GPU is different. But you should first do some research on Bilibili. Search for “your GPU model + overclock (超频)”, watch five or six videos plus the comments, and you’ll get a sense of your GPU’s “average silicon lottery.” You can then tweak from that baseline.
On Arch I use the LACT program. I do NOT recommend manually editing the GPU’s profile. Using a ready-made overclocking tool brings two benefits:
- It comes with a daemon. Enabling it makes the config take effect automatically, and it prevents the config from being overridden.
- It can list the available config options. Whereas if you edit the config file directly, you might break things — not all config options apply to GPUs of all generations.
For my GPU, the configuration that ended up stable in games is: VRAM +100MHz, GPU voltage -85mV, power limit 240W -> 264W. It can actually also pass testing at VRAM +150MHz, voltage -100mV, but I don’t recommend that for daily use. Being stable in one test (like Superposition or 3DMark) doesn’t mean it’s stable in all games. On Windows, instability manifests as “the AMD GPU dropping its driver”; on Linux, it manifests as the desktop environment freezing, then recovering after a while with a prompt saying “the GPU has recovered.” If you run into this during a game, it means your config is no longer stable. I also ran into this a few times in the previous days, and later it became stable after I dialed back the undervolt a little. In short, stability comes first — passing a test is just a reference.
Enabling FSR4 Support
The first time I played Cyberpunk 2077, I found that the FSR support topped out at version 3.1 only. I searched online and found that AMD had long since announced that Cyberpunk 2077’s FSR version already supported 4.0 (there were reports about it back in April 2025), so why could I only select 3.1 at most on my end?
Later I found out it was because Steam’s Proton version was too old. Steam’s Proton is a compatibility layer that lets Windows games run on Linux. Although Proton updates fairly frequently, it sometimes still lags behind game updates on Windows. Per a community tip, we need to switch to CachyOS’s Proton build (CachyOS is an Arch Linux–based distribution specifically optimized for gaming). After switching to CachyOS’s Proton build, FSR4 became selectable.
You need to install the proton-cachyos package:
yay -S proton-cachyosThe installation takes about 1 hour, so I’d advise against installing it right before bed, or you’ll be held hostage. Once installed, just switch the Proton version to the CachyOS one in the game’s “Properties” in Steam.
Game Streaming in Headless Mode
After getting the system set up, I started tinkering with game streaming in headless mode. Here I chose the combination of Sunshine + Moonlight. Sunshine is an open-source, self-hosted game streaming server, and Moonlight is an open-source NVIDIA GameStream client that can run on a variety of devices.
Installing Sunshine is very easy — Arch Linux users can install it directly from the AUR:
yay -S sunshine-gitAfter installation, run Sunshine, and in the web UI (note: access it over https) set up your password and codecs. Then install Moonlight on your client device, connect to your Sunshine server (the pairing code is also shown in the web UI), and you can start gaming.
But with this setup, your monitor has to stay on the whole time you’re gaming. If you turn off the monitor, Sunshine throws a tantrum and tells you “Streaming Error,… Is the host display turned on?” Keeping the monitor on forever isn’t a long-term solution — we need to save energy! So we need to make Sunshine work properly in headless mode too. There are two methods, both of which solve this problem:
- Method 1: On your favorite shopping site, buy a thing called an HDMI dummy plug (HDMI Dummy Plug) and plug it into the monitor’s HDMI port — wait, into the GPU’s HDMI port — so the computer thinks a monitor is connected, and Sunshine won’t throw a tantrum.
- Method 2: Force a “fake” monitor via kernel parameters. This one is a bit more technical, so let’s go through it in detail:
It makes the Linux kernel believe, right from the boot stage, that “there’s a monitor plugged into the HDMI port.” First, prepare an EDID file. You need a file to tell the GPU “what kind of monitor I have connected.” Usually you don’t need to go through the trouble of generating an EDID file from scratch; the simplest approach is to just dump the EDID file from your current monitor.
If you don’t have edid-decode installed, install it first:
yay -S edid-decodeThen take a look in this directory:
ls /sys/class/drmEveryone’s configuration here will be different. For example, my output looks like this:
card1 card1-DP-1 card1-DP-2 card1-DP-3 card1-HDMI-A-1 card1-Writeback-1 renderD128 versionAmong these, card1 contains some GPU configuration, which we’ll ignore. The rest — card1-DP-1, card1-DP-2, card1-DP-3 — are three DisplayPort ports, and card1-HDMI-A-1 is the HDMI port. In my case, my real monitor is plugged into the HDMI port, so I go into the card1-HDMI-A-1 directory and dump the EDID:
cat /sys/class/drm/card1-HDMI-A-1/edid | edid-decodeIf you see information about your monitor (like resolution, refresh rate, vendor info, etc.), that means you succeeded. Next, we save this EDID info to a file:
sudo cat /sys/class/drm/card1-HDMI-A-1/edid > /usr/lib/firmware/edid/my_monitor.binNext, let’s find an unused port on the GPU. You could of course try them one by one using the cat edid method above — if edid-decode says empty stdin, then it’s empty — but a simpler way is to run:
for p in /sys/class/drm/*/status; do con=${p%/status}; echo -n "${con#*/card?-}: "; cat $p; doneWe just need to find a port whose status is disconnected. For example, my output looks like this:
DP-1: disconnected
DP-2: disconnected
DP-3: disconnected
HDMI-A-1: connected
Writeback-1: unknownSo I’ll pick the DP-3 port to fake a monitor on. Note: you’d best not plug a monitor into this port either, otherwise there might be conflicts. Next, we need to tell the kernel the path to this EDID file.
You need to modify the Bootloader config (GRUB or systemd-boot) and add parameters that force-enable the monitor.
-
If you use GRUB: Edit /etc/default/grub, and inside the quotes of GRUB_CMDLINE_LINUX_DEFAULT, append:
plaintextdrm.edid_firmware=DP-3:edid/my_monitor.bin video=DP-3:eRemember to replace this
DP-3:with the port name you found above. Also, replaceedid/my_monitor.binwith the filename you placed in step one (the path is relative to /usr/lib/firmware/ by default). Forvideo=DP-3:e, the:eis the most critical part — it means “Enable” (force-enable), telling the kernel to ignore the physical connection status.Then update GRUB:
bashsudo grub-mkconfig -o /boot/grub/grub.cfg -
If you use systemd-boot: Directly edit the corresponding .conf file under
/boot/loader/entries/, and append the same content to the end of the options line. Note that the .conf file and directory structure may differ for everyone and every system, so you’ll need to find it yourself. For example, mine is /boot/loader/entries/2026-01-20_14-25-25_linux-zen.conf, so I append to the end of the options line in this file:
plaintextdrm.edid_firmware=DP-3:edid/my_monitor.bin video=DP-3:e
Then note ⚠️ you need to update the initramfs! Because the EDID file needs to be packed into the boot image so the GPU driver can read it when loading.
Edit /etc/mkinitcpio.conf, find the FILES=() line, and add your EDID file to it:
FILES=(/usr/lib/firmware/edid/my_monitor.bin)Then regenerate it:
sudo mkinitcpio -PAfter rebooting, you’ll find that even with the monitor turned off, Sunshine won’t throw a tantrum anymore! You can happily game in headless mode! Better yet, very smart desktop environments like KDE will even automatically detect changes in monitor status: when you connect a real monitor, you can go into display settings and disable that virtual monitor so you can use the real one normally; and when you turn off the monitor, KDE detects that the current monitor is unavailable and automatically switches to that virtual monitor, with no manual intervention needed at all — very smart.
Switching Desktops
Honestly, when I did archinstall I chose niri as my desktop environment right away. (A big part of why I use Linux at all is that I’ve been craving niri! macOS has a similar thing called PaperWM, but its animations don’t look good, and it’s also limited by macOS’s WM — in short, it just can’t be done well.) But the moment I got in, this niri was way too barebones 😅. All navigation relies entirely on the keyboard, and without configuration it’s completely unusable. So I reinstalled and went with KDE Plasma 😅. But after some ricing, I think niri is now quite usable, and I’ve made it my primary desktop environment. Behold the current look:
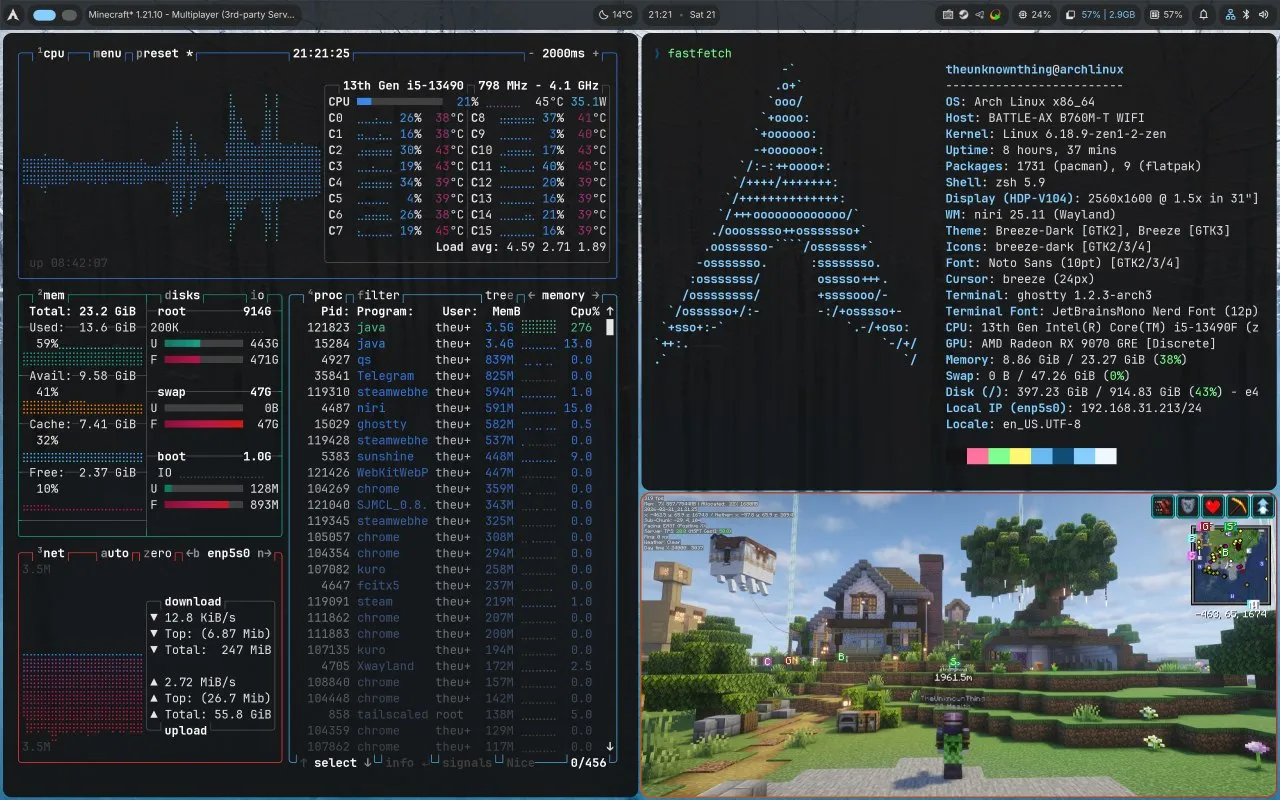
When the Linux community shows off their desktop, they always open a btop, open a fastfetch, and then open something else in the bottom-right corner. Following this tradition, I arranged mine the same way. In the bottom-right corner is the Minecraft server my classmates and I run 😁.
As for aesthetics, everyone’s tastes differ, but let me throw out a few ricing ideas here that I personally think are pretty good, to get the ball rolling:
-
Background blur: I personally think background blur is a very important ricing element. It makes the interface look more layered and reduces visual fatigue. However, as of 2026.2, niri doesn’t support background blur; the background blur of the terminal in the image above is achieved by setting “draw-border-with-background false” in niri and letting the terminal draw the background blur itself. The good news is that as I write this article, niri’s developer has already implemented background blur on his development branch — you can see this commit: Link to GitHub commit ↗. If you want to try it, you can also compile the code on the https://github.com/niri-wm/niri/tree/wip/branch ↗ branch. So in the near future niri will natively support background blur — stay tuned!
-
Waybar: Waybar is a very handy status bar tool that supports extensive customization. You can adjust its appearance and functionality by editing the config file, such as adding system info, network status, battery status, and so on. Waybar also has a rich selection of themes; you can find many ready-made themes online, or design one yourself. Its themes are implemented through a big pile of CSS, so in theory, as long as you can write CSS, you can design whatever status bar you want. A really nice base is this theme ↗, which gives you that “rounded pill” feeling. Don’t take my word for it — here’s the official preview image:

You can add many modules you like into it; for example, I added a module showing the current CPU usage, memory usage, and network status. You can also add info about the currently playing music, or a module showing the current time and date, or even a module showing the current weather. In short, Waybar is highly customizable, and you can design your status bar to fit your needs. Here’s my current Waybar:

-
Fuzzel: niri’s default application launcher is fuzzel, but the default state is really ugly. Fortunately, fuzzel’s theme configuration is fairly simple — it’s just a standard .ini file that defines some color and font config options. I went with the Tokyo Night color scheme, tweaked the font and border config a bit, added some background blur, and here’s the result:
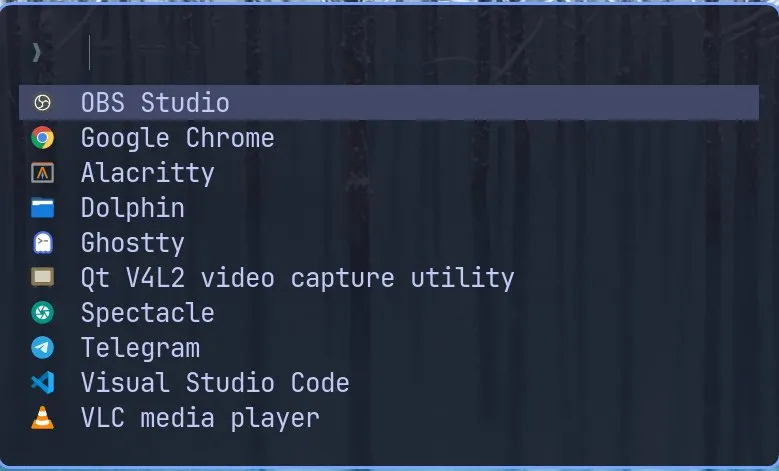
You can argue that you still think it’s ugly, but I think it already looks pretty good. After all, it’s just these few lines of config — if you need it, you can copy my config file, or tweak it yourself to fit your taste.
My Fuzzel config file
ini[main] font=JetBrainsMono Nerd Font:size=13 prompt="❯ " icon-theme=Papirus-Dark icons-enabled=yes width=45 lines=10 horizontal-pad=20 vertical-pad=20 inner-pad=10 layer=overlay [colors] background=1a1b26e6 text=c0caf5ff match=f7768eff selection=414868ff selection-text=c0caf5ff selection-match=ff899dff border=7aa2f7ff [border] width=2 radius=10 -
Alacritty: niri’s default terminal is Alacritty. Alacritty is a very fast GPU-accelerated terminal emulator that supports extensive customization. Alacritty’s default “black background, white text, no padding” style is very barebones. We can beautify it by editing the config file. In newer versions, Alacritty has completely deprecated the original YAML format and switched entirely to the TOML format. Many old tutorials online may already be outdated. If you need my config file, I’ll likewise paste it here:
My Alacritty config file
Alacritty automatically reads
~/.config/alacritty/alacritty.toml. Also, remember to install the font (I use JetBrains Mono Nerd Font), otherwise you may get garbled text or icons that don’t display. Use
bashsudo pacman -S ttf-jetbrains-mono-nerdto install this font.
toml[window] padding = { x = 16, y = 16 } opacity = 0.90 decorations = "None" dynamic_title = true [font] normal = { family = "JetBrainsMono Nerd Font", style = "Regular" } bold = { family = "JetBrainsMono Nerd Font", style = "Bold" } italic = { family = "JetBrainsMono Nerd Font", style = "Italic" } size = 12.0 [cursor] style = { shape = "Beam", blinking = "On" } [colors.primary] background = "#1a1b26" foreground = "#c0caf5" [colors.normal] black = "#15161e" red = "#f7768e" green = "#9ece6a" yellow = "#e0af68" blue = "#7aa2f7" magenta = "#bb9af7" cyan = "#7dcfff" white = "#a9b1d6" [colors.bright] black = "#414868" red = "#ff899d" green = "#b1e37b" yellow = "#f3c27b" blue = "#8cb6ff" magenta = "#ceafff" cyan = "#8fe2ff" white = "#c0caf5"
Or maybe, by the time you’ve read this far, you’re already tired and thinking “I don’t care about ricing anyway,” or “why are there so many config files to write?” Well, I’ve got one ultimate move left. Just use dankmaterialshell. This project turns desktop ricing into a one-click install script that instantly makes your desktop look great. Its previews look fantastic (it adopts a consistent Google Material 3 design style). Go check out the previews at the project page ↗. Installation is also very easy — just run the command below:
curl -fsSL https://install.danklinux.com | shIt lets you freely choose your window manager (supports niri, hyprland, …) and freely choose your terminal (ghostty, alacritty, …). In short, if you’re not an artist, or you just need an “out-of-the-box” ricing solution, this project is absolutely a great choice. My desktop is the result of installing this project and then tweaking the config a little.
Tinkering with desktop ricing is endless. Once niri’s native background blur lands, I want to rice my desktop some more — stay tuned for the next blog post!